Creating a Hanging Indent in Microsoft Word for Professional Documents
Formatting your documents correctly is essential for achieving a professional look. One important technique is the **hanging indent**, commonly used for citations in academic writing and for enhancing the readability of lists. In this article, we will explain how to effectively create a hanging indent in Microsoft Word, ensuring your document presentation aligns with formatting guidelines used in relationships, essays, and reports.
Understanding Hanging Indents
A **hanging indent** is a formatting style where the first line of a paragraph is flush left, while all subsequent lines are indented to the right. This style is particularly useful for reference formatting in bibliographies, making it easier for readers to locate sources. Knowing how to **create a hanging indent** can improve the structure and clarity of your documents significantly. For example, in academic formatting processes, having consistent hanging indents can enhance the visual coherence of your references and ensure compliance with style guides.
How to Manually Create a Hanging Indent in Word
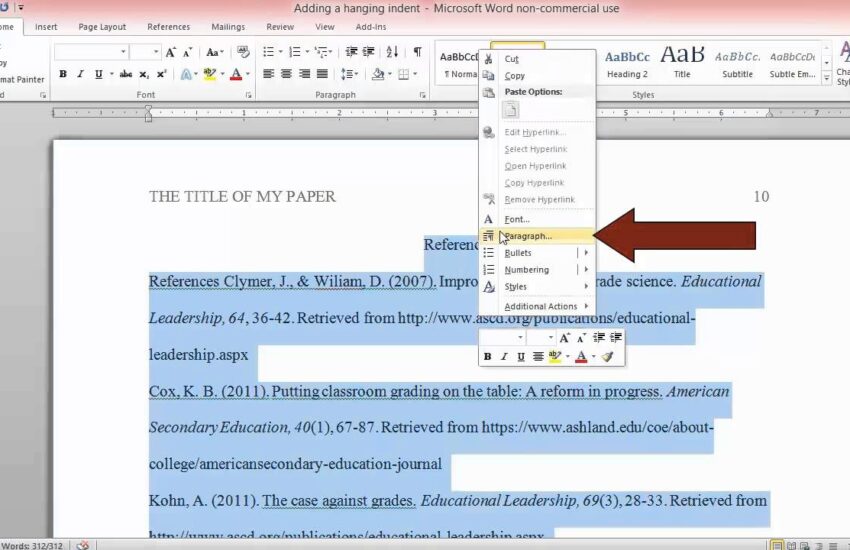
To **manually create a hanging indent**, follow these steps:
- Select the paragraph you wish to modify.
- Right-click and choose “Paragraph” from the context menu.
- In the “Indents and Spacing” tab, locate the “Indentation” section.
- Under “Special,” select “Hanging” from the dropdown menu.
- Specify the indent length in the box next to it (usually set to 0.5 inches).
- Click “OK” to apply the changes.
This method gives you precise control over the paragraph settings and allows for a tailored **text indentation** solution that meets your specific needs.
Using the Ruler to Create Hanging Indent
Alternatively, Microsoft Word provides an easy way to create a **hanging indent** using the ruler feature:
- Ensure your ruler is visible. If it’s not, go to “View” and check the “Ruler” option.
- Click on the paragraph you want to adjust.
- On the ruler, look for the two sliders (the top one is the first line indent, and the bottom is the hanging indent).
- Drag the bottom slider to the desired indent length (typically 0.5 inches) while leaving the top slider at the margin.
This method is not only quick but also visually intuitive, which can greatly enhance document efficiency and control over paragraph formatting.
Automatic Approaches to Hanging Indents in Word
Besides manual adjustments, **Word settings** offer automatic methods for achieving a hanging indent, which can optimize your workflow significantly. Here’s how to make the most of Word’s formatting tools.
Using Styles for Automatic Indentation
One effective method to ensure consistent **indent options** across a document is by utilizing Word’s paragraph styles. Here’s how to apply this feature for **automatic indentation**:
- Highlight the text you wish to format.
- Go to the “Home” tab and find the “Styles” group.
- Right-click on the relevant style (e.g., Normal) and select “Modify.”
- In the modified style options, click on “Format,” then “Paragraph.”
- Choose “Hanging” under the “Special” indentation options.
- Click OK, and then OK again to save the style modification.
This approach establishes **consistent formatting** within your document, streamlining editing and maintaining clarity throughout.
Creating a Template for Future Use
Setting up a template can greatly enhance your productivity when preparing professional documents. When you configure a template with predefined indentation and paragraph settings, you can easily create hanging indents and formatting setups that align with your **academic formatting** requirements. Save your document with these settings, and upon opening it later, you’ll have instant access to all the formatting capabilities you previously established.
Formatting Best Practices for Improved Readability
Implementing the right adjustment and formatting techniques can make a significant difference in how information is conveyed. Here are several best practices to follow for improved document readability and presentation:
Use Clear Formatting Guidelines
Adhere to established **formatting guidelines** unique to your institution or publication to ensure compliance with protocols related to style guides. Whether it’s APA, MLA, or another style, having correct hanging indents is paramount. For instance, many journals require precise **citation formatting** where hanging indents are not merely a recommendation but a requirement.
Utilize Word Features for Enhanced Document Design
Microsoft Word is embedded with an array of features designed to assist in **document optimization**. Leveraging styles and utilizing the **text layout** within Word can vastly improve the overall organization of your text. Additionally, utilizing tools like bullet points and numbered lists enhances readability, ensuring that your document is easily navigable and aesthetically pleasing.
Conclusion
Mastering **hanging indents** in Microsoft Word is a fundamental skill for anyone aiming to create professional documents. Whether opting for manual methods or utilizing automation through **Word settings**, these approaches allow for effective document design. Clear formatting not only improves readability but also aligns your work with academic and professional standards.
FAQ
1. What is a hanging indent?
A **hanging indent** is a style of paragraph formatting where the first line sits flush left while subsequent lines are indented. This formatting is prevalent in reference lists and bibliographies, helping to improve readability.
2. How do I create automatic hanging indents in Microsoft Word?
You can create automatic hanging indents by modifying paragraph styles in Word. By setting the hanging indent in a style, you can apply it consistently across your document, saving time and ensuring cohesive formatting.
3. Can I use hanging indents for bullet points?
Yes, hanging indents can also be used for bullet points formatting. When you create bullets in Word, the same techniques to set hanging indents can be applied to enhance the layout and appearance of your lists.
4. Are choosing hanging indents professional in any setting?
Definitely! Hanging indents are widely regarded as professional formatting options, especially in academic and research writing where citation clarity is important.
5. Where can I find more Word formatting tips?
You can explore additional **formatting tips** by visiting various online resources such as guides on forum sites like Word editing blogs and articles dedicated to Microsoft Word features. Educational platforms often have tutorials aimed at enhancing **Word processing skills**.